
Note: you can download the full code of this example in this repo. If you have any comments about this article, you can start an issue there, or contact me.
PyBind11 vs ctypes
There are basically two ways to call C++ from Python: using the PyBind11 C++ library to produce a Python module, or using the cytpes Python package to access a compiled shared library. Using PyBind11 we can more easily share many data types, while using ctypes is a much lower-level C-style solution.
In my case, I want to be able to harness C++ performance and portability, but I don’t want to give up on the interactivity of interpreted languages for quick exploration and debugging.
Fortunately, calling C++ from Python is not as hard as it might seem at first. This way, we can grasp some of Python’s interactivity while developing C++ code.
In my case, I want to use Python to:
- Pass some problem parameters to C++
- Call C++ code to run computation-intensive routines
- Retrieve final results, as well as some intermediate computations for debugging.
- Explore the results interactively, and produce plots and reports.
The problem of using ctypes, is that sharing many data types requires quite a lot of low-level workarounds. For example, while ctypes doesn’t support basic things such as complex numbers, PyBind11 makes Numpy fully interoperable with Eigen, requiring minimal code.
However, I also found a small problem with PyBind11. It turns out that, after recompiling the C++ code and trying to reload the Python module generated by PyBind, nothing happened. The only way to reload the compiled module was to restart my Python session. Anyway, this is not a big deal, as the startup time of Python is negligible. And probably, this step can be automated at the IDE level.
So, the issue is now how to make the most out of PyBind11.
Sharing a C++ Class with PyBind11
The official documentation of PyBind11 is excellent, and I was able to start using it with no problems. However, I want to share a super quick-start guide for this library, and how I intend to use it.
Pybind11 is a header-only library, and you can just get it with:
pip install pybind11While structuring all of your C++ code as a class is not necessary, Pybind11 will make things very easy for you if you have a class to share between C++ and Python. (Actually, I’m more a vector of struct kind of person, and I always want to introduce the minimum number of classes in a given project)
However, in this case I found that using a facade design pattern (see wiki) could lead, simultaneously, to very simple Python/C++ interoperability and a nice API.
So, I came up with a simple class. It basically contains:
- A constructor that reads the problem parameters.
- A
run()function that performs a computation. - Some
Eigenarrays as public variables to store results.
Here is my minimal example:
// mylib.h
#include <Eigen/Dense>
#include <cmath>

using Eigen::Matrix, Eigen::Dynamic;
typedef Matrix<std::complex<double>, Eigen::Dynamic, Eigen::Dynamic> myMatrix;

class MyClass {

    int N;
    double a;
    double b;

public:

    Eigen::VectorXd v_data;
    Eigen::VectorXd v_gamma;

    MyClass(){}
    MyClass( double a_in, double b_in, int N_in)
    {
        N = N_in;
        a = a_in;
        b = b_in;
    }

    void run()
    {
        v_data = Eigen::VectorXd::LinSpaced(N, a, b);

        auto gammafunc = [](double it) { return std::tgamma(it); };
        v_gamma = v_data.unaryExpr(gammafunc);
    }
};
To share this class, we need to add a little C++ code. I’d rather do this in a separate file, that contains all we need to create the python wrapper.
// pywrap.cpp
#include <pybind11/pybind11.h>
#include <pybind11/eigen.h>
#include "mylib.h"

namespace py = pybind11;
constexpr auto byref = py::return_value_policy::reference_internal;

PYBIND11_MODULE(MyLib, m) {
    m.doc() = "optional module docstring";

    py::class_<MyClass>(m, "MyClass")
    .def(py::init<double, double, int>())
    .def("run", &MyClass::run, py::call_guard<py::gil_scoped_release>())
    .def_readonly("v_data", &MyClass::v_data, byref)
    .def_readonly("v_gamma", &MyClass::v_gamma, byref)
    ;
}
A few things to highlight:
- The class constructor signature is specified with
.def(py::init<int, double, double>()) - For the
run()function, we want to release the GIL (Global Interpreter Lock), which would prevent our function from using multiple threads.
Finally, this can be compiled using the following CMakeLists.txt file:
cmake_minimum_required(VERSION 3.10)

project(MyLib)
set(CMAKE_CXX_STANDARD 20)
set(PYBIND11_PYTHON_VERSION 3.6)
set(CMAKE_CXX_FLAGS "-Wall -Wextra -fPIC")

find_package(pybind11 REQUIRED)
find_package(Eigen3 REQUIRED)

pybind11_add_module(${PROJECT_NAME} pywrap.cpp)

target_compile_definitions(${PROJECT_NAME} PRIVATE VERSION_INFO=${EXAMPLE_VERSION_INFO})
target_include_directories(${PROJECT_NAME} PRIVATE ${PYBIND11_INCLUDE_DIRS})
target_link_libraries(${PROJECT_NAME} PRIVATE Eigen3::Eigen)
Now you are ready to go. If you are using VS Code, after configuring the CMake extension, just hit F7 to compile your C++ library.
Calling the C++ library from Python
The process is really straightforward and should work out of the box. However, there are a few steps to optimize an interactive workflow that are a slightly trickier and worth implementing, as well.
For example, if you are executing your Python environment and your complied library goes into a build directory, you can do:
import sys
sys.path.append("build/")
from MyLib import MyClass

import matplotlib.pyplot as plt

Simulation = MyClass(-4,4,1000)
Simulation.run()

plt.plot(Simulation.v_data, Simulation.v_gamma, \
"--", linewidth = 3, color=(1,0,0,0.6),label="Function Value")
plt.ylim(-10,10)
plt.xlabel("x")
plt.ylabel("($f(x) = \gamma(x)$)")
plt.title("(Gamma Function: $\gamma(z) = \int_0^\infty x^{z-1} e^{-x} dx$)",fontsize = 18);
plt.show()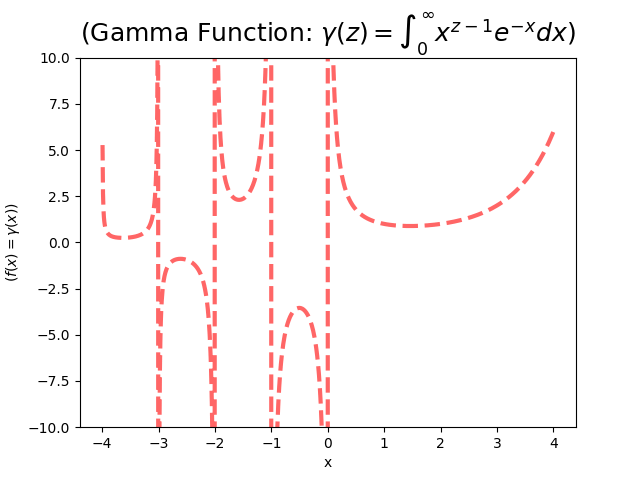
Note that Eigen vectors got transformed into Python arrays automatically.
Ater modifying myLib.hpp, only one line of code in pywrap.cpp has to be added per each new function or variable we want to expose.
Unfortunately, this won’t lead to a completely interactive workflow. When you recompile your C++ code after changes, nothing will happen on the Python side. Even if you try to reload the Python module using importtools:
import importlib
importlib.reload(MyLib)
nothing happens. The reason is that compiled code can’t be reloaded in Python.
So, when using PyBind11, you need to restart you Python session each time you recompile your C++ code, something which I find slightly annoying for development purposes. However, it is a small price to pay, as the startup time of Python is negligible, and there is probably a way to automate the process with some IDE hotkeys or other tools.
Summary
So, this is how you can easily call a C++ library from Python.
In particular, this two-step process can result in a development workflow that is quite interactive. Even though we have an edit-compile-run workflow, we’ve added an interpreter at the end, so now our workflow looks like edit-compile-run-explore.
In the future, I’m planning to incorporate two features to this workflow:
- The fist one are C++20 modules, which should speed up compilation times of large C++ projects. Unfortunately, CMake is still not compatible with modules (see this issue for updates), and apparently one would have to rely on a build system like Ninja-Build to have this functionality available right now.
- The other thing would be fixing the need to (manually) restart the Python session after recompiling the C++ code. For this, I am hoping that maybe something could be done about this at the VSCode level. So far, the best option in VS Code seems to kill the Python session, and then executing the Python code with
Shift+Enter, which creates a new session if there is not one already open.
Remember: you can download the full code of this example in this repo. If you have any comments, you can write me or start an issue there, as well.